이전에는 웹 콘솔, 즉 h2 console 을 이용하여 직접 DB를 SQL 로 갱신했었다.
이제 본격적으로 Application Server 와 h2 DB를 연결하여
순수 JDBC 방식으로 SQL을 날려서 DB를 갱신해보자.
이 때, 서버 start, h2 console 연결 유지해야한다. (h2.sh 에 있는 h2-console의 세션아이디로 접근이 가능하므로)
1. 환경설정
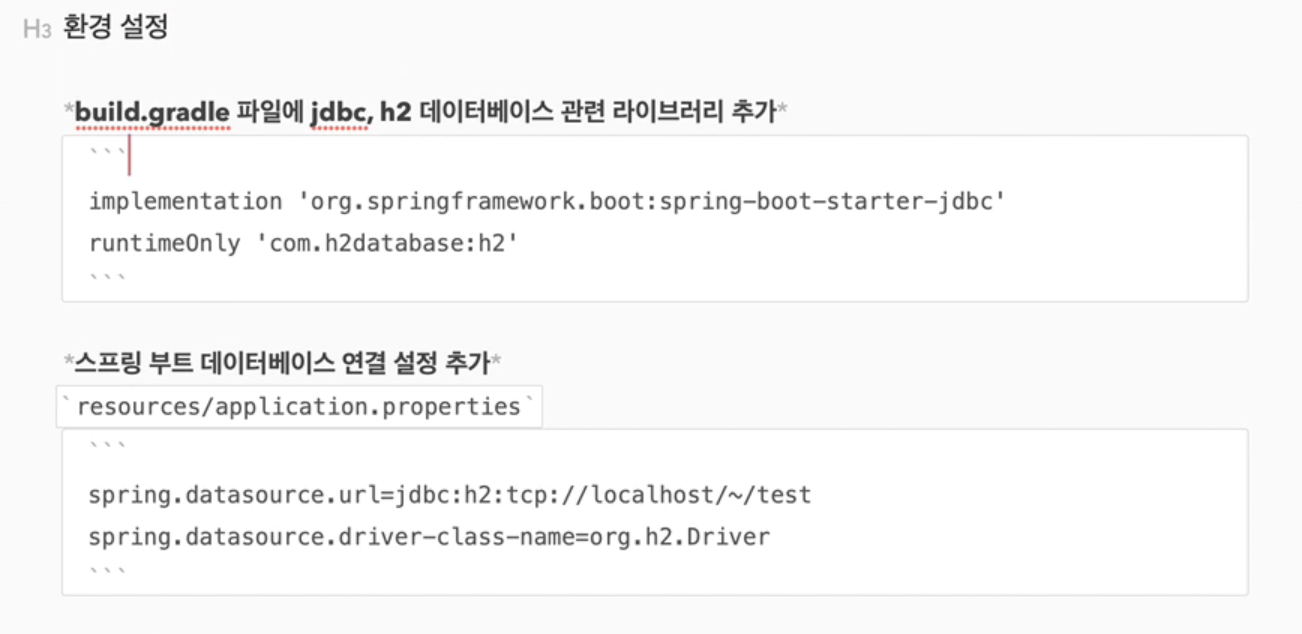
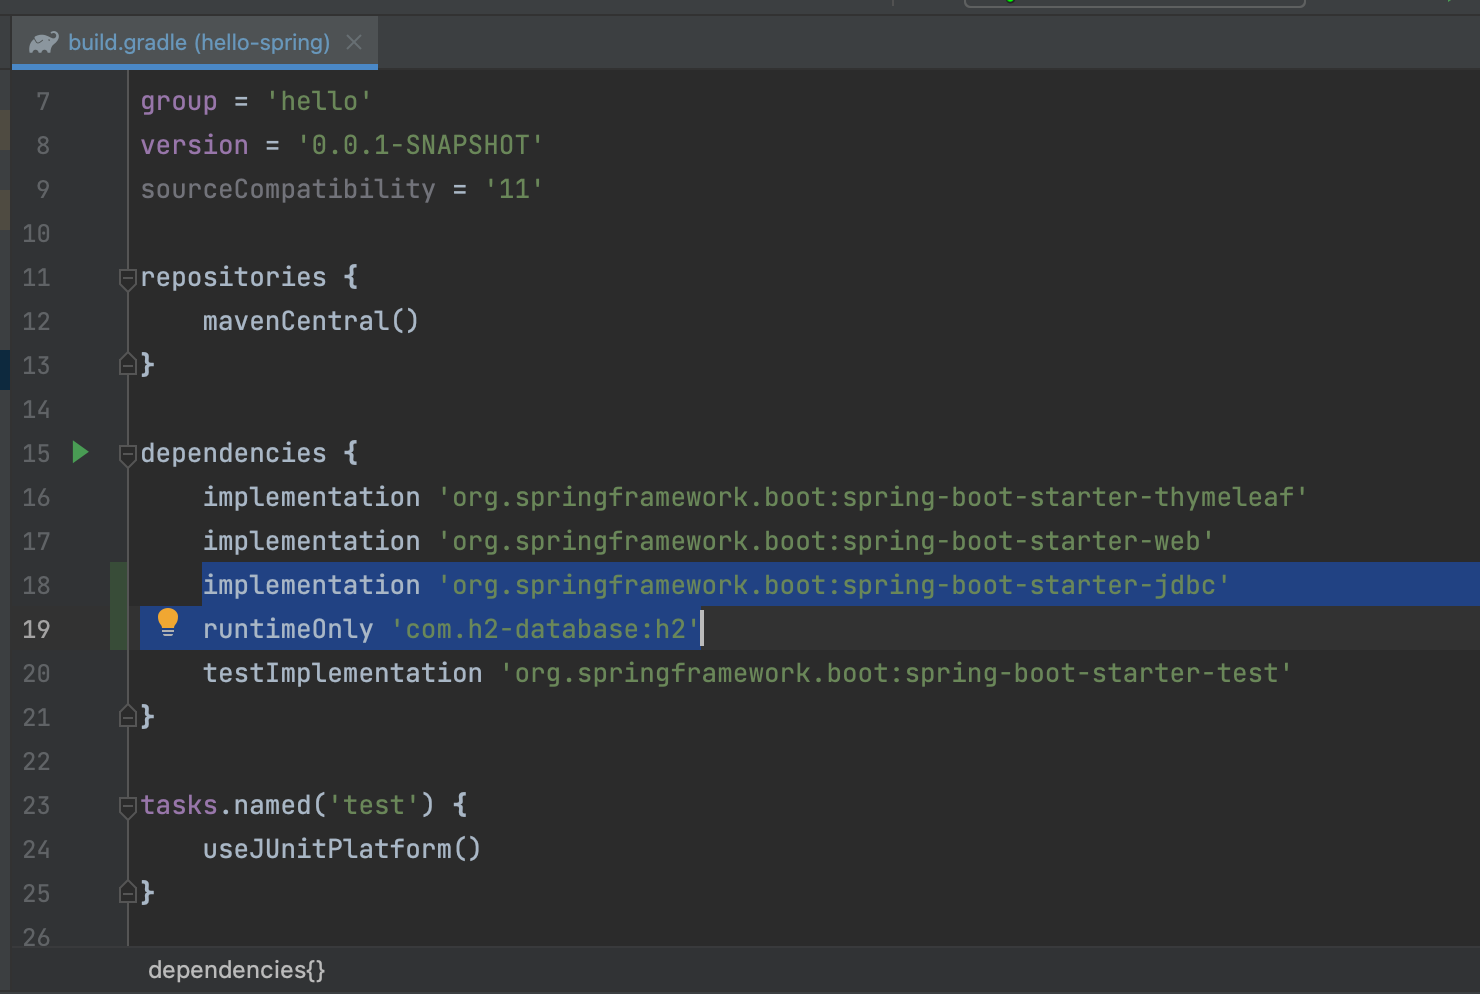
Java Spring Boot의 환경에서 순수 jdbc 기술 적용을 위한 jdbc driver가 필요하므로, jdbc 라이브러리를 추가한다.
또한, h2 database 와 붙을 때 database 가 제공하는 클라이언트가 필요하므로 h2 라이브러리도 추가한다.
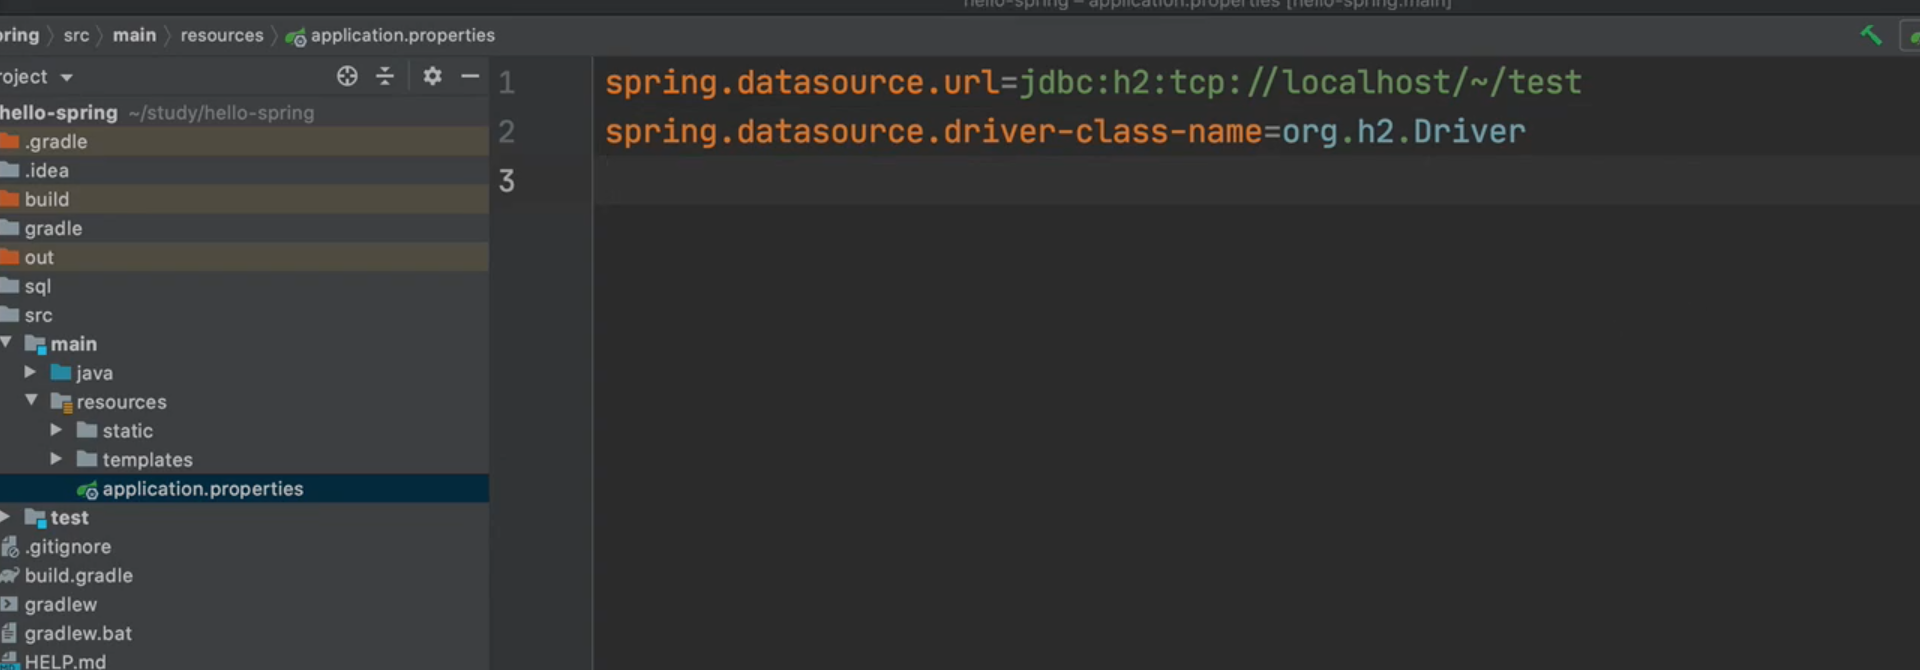
그리고 db에 붙으려면 접속정보를 넣어야하므로 application.properties 에 JDBC url, driver class name 을 추가해주고 gradle 을 갱신(코끼리 아이콘 클릭)해준다.
원래는 db 접속 id, password 도 설정해주어야하는데, h2 에서는 크게 필요하지 않다.
저렇게 설정해두면, Spring 이 저 접속정보를 만들어놓는다.(따라서 javax.sql.Datasource 로 주입할 수 있음)
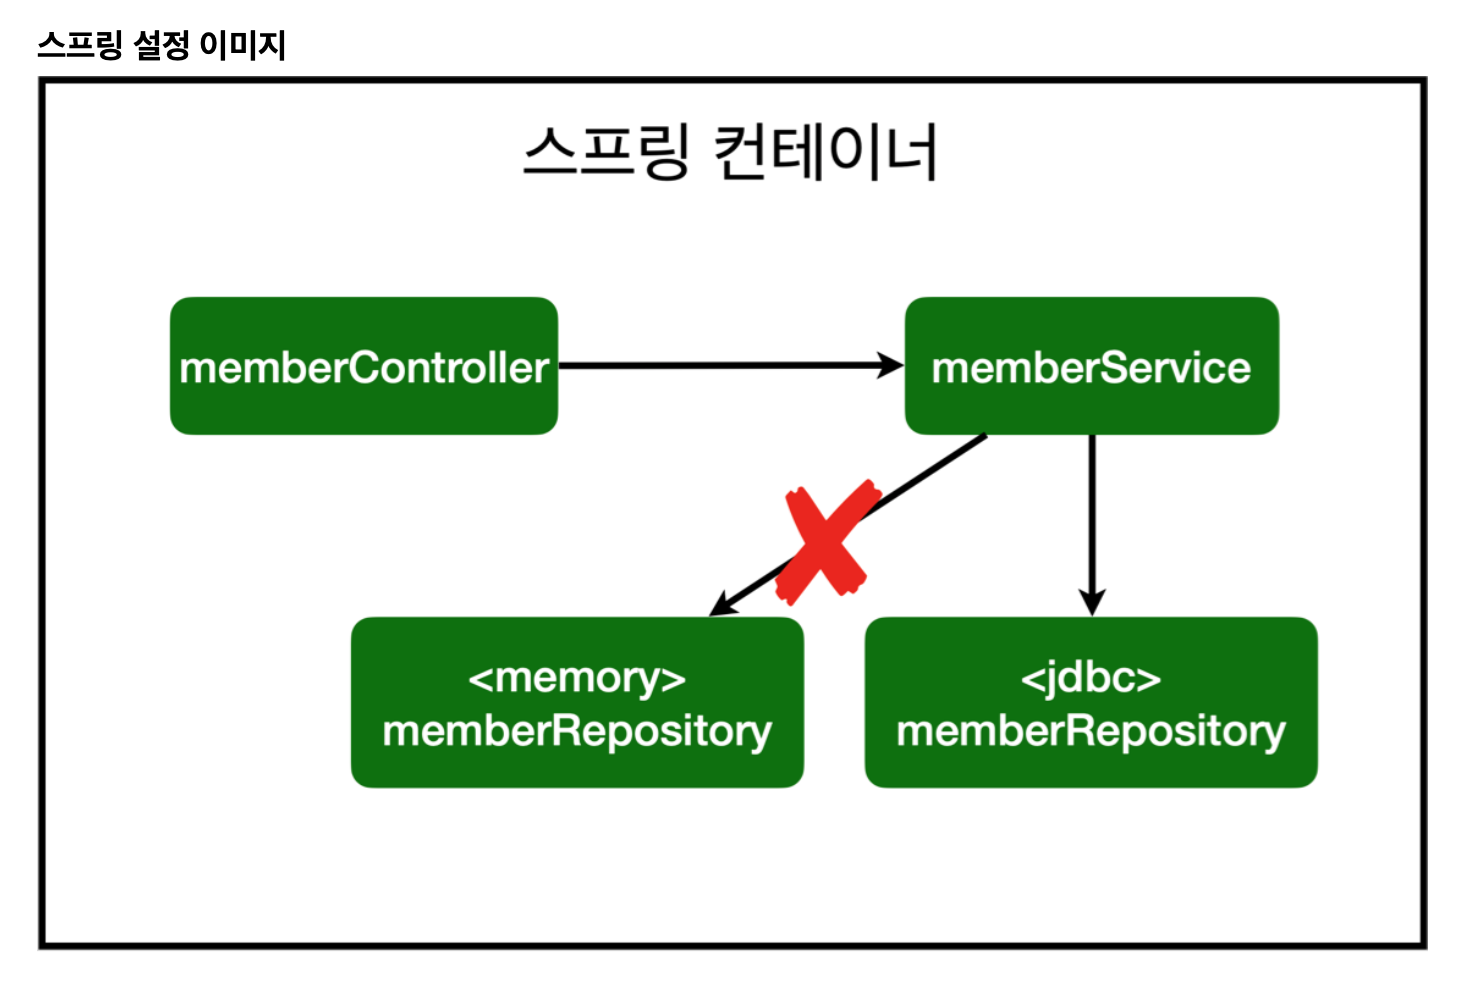
2. JdbcMemberRepository 생성

repository 의 구현체인 MemoryMemberRepository 대신, Jdbc 를 이용한 구현체가 필요하므로 JdbcMemberRepository를 생성한다.
그리고 application.properties 에서 추가한 접속정보를 Spring 이 갖고있으므로, DataSource 를 생성하여 JdbcMemberRepository 와 의존성을 주입한다.
쉽게 말해 접속정보에 따라 Jdbc 구현체가 Spring 에서 호출될 때, 생성자 생성시 연결될 수 있도록 하는 것
2-1. getConnection, close 2개 static 메서드 생성
private Connection getConnection() {
    return DataSourceUtils.getConnection(dataSource);
}
private void close(Connection conn) throws SQLException {
DataSourceUtils.releaseConnection(conn, dataSource);
}private void close(Connection conn, PreparedStatement pstmt, ResultSet rs) {
try {
if (rs != null) {
rs.close();
}
} catch (SQLException e) {
e.printStackTrace();
}
try {
if (pstmt != null) {
pstmt.close();
}
} catch (SQLException e) {
e.printStackTrace();
}
try {
if (conn != null) {
close(conn);
}
} catch (SQLException e) {
e.printStackTrace();
}
}
- DataSourceUtils 를 활용하여 JDBC 로 CRUD 가 끝나면 리소스를 반환해주어야한다.(반환하지 않으면 리소스가 계속 쌓여 장애가 일어남)
- close(Connection conn, PreparedStatement pstmt, ResultSet rs) : rs, pstmt, conn 순서로 리소스가 사용된 순서의 역순으로 리소스를 반환
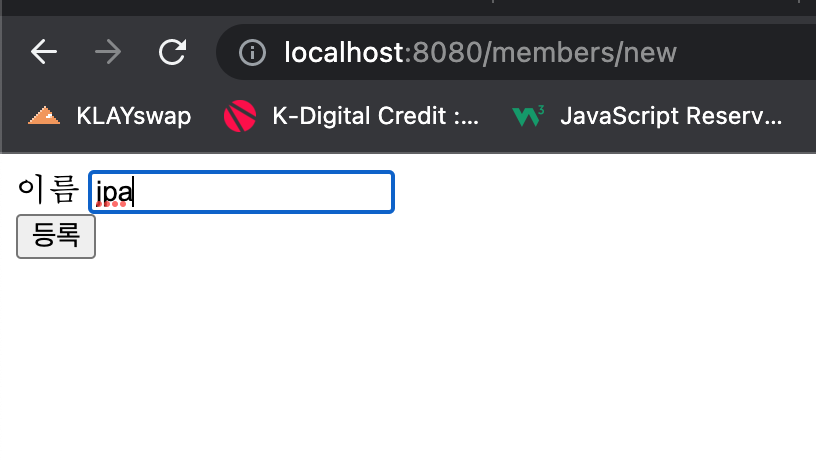
2-2. Member Save(Member member) : 회원 등록 method 구현
@Override
public Member save(Member member) {
    String sql = "insert into member(name) values(?)";
    Connection conn = null;
    PreparedStatement pstmt = null;
    ResultSet rs = null;
    try {
        conn = getConnection();
        pstmt = conn.prepareStatement(sql,
                Statement.RETURN_GENERATED_KEYS);
        pstmt.setString(1, member.getName());
        pstmt.executeUpdate();
        rs = pstmt.getGeneratedKeys();
        if (rs.next()) {
            member.setId(rs.getLong(1));
        } else {
            throw new SQLException("id 조회 실패");
        }
        return member;
    } catch (Exception e) {
        throw new IllegalStateException(e);
    } finally {
        close(conn, pstmt, rs);
    }
}
- Statement.RETURN_GENERATED_KEYS : INSERT문에 대해 자동 생성 키를 검색하여 반환해준다. 즉, insert sql 로 추가될 id 값을 받아 prepareStatement 타입에 그 값과 입력받은 member name을 바인딩하기위함(이후 getGeneratedKeys() 와 연동)
- pstmt.setString(1, member.getName()) : sql의 ? 부분에 1을 입력받은 member의 name을 받아와 매핑한다.(1 : sql 의 parameterIndex, ?)
- pstmt.executeUpdate() : 입력한 sql 을 실제로 날려서 DB를 갱신해준다.
- rs = pstmt.getGeneratedKeys() : 쿼리를 날려서 DB가 갱신된 이후, 생성한 갱신 정보를 ResultSet 타입으로 담는다.(Statement의 RETURN_GENERATED_KEYS 와 연동)
- rs.next() : 위에서 DB 갱신이 잘 이루어졌다면 값이 존재하므로, member id 도 set 해준다.
- 참고
2-3. Optional<Member> findById(Long id) : id로 회원정보 조회
@Override
public Optional<Member> findById(Long id) {

    String sql = "select * from member where id = ? ";

    Connection conn = null;
    PreparedStatement pstmt = null;
    ResultSet rs = null;

    try {
        conn = getConnection();
        pstmt = conn.prepareStatement(sql); // sql 조회 쿼리문 pstmt 세팅
        pstmt.setLong(1, id); // 입력받은 id 값을 세팅(파라미터 ? 개수 1개이므로 1)

        rs = pstmt.executeQuery(); // 쿼리날려서 얻는 결과값 전체 담음

        if(rs.next()) {
            Member member = new Member();
            member.setId(rs.getLong("id")); // 결과값 중 "id"에 대한 값을 member의 id 변수에 세팅
            member.setName(rs.getString("name"));
            return Optional.of(member); // 세팅된 member 객체를 Optional 로 감싸 nullable 처리
        } else {
            return Optional.empty(); // 쿼리에 대한 결과가 없을때 empty 반환
        }
    } catch(Exception e) {
        throw new IllegalStateException(e);
    } finally {
        close(conn, pstmt, rs);
    }
}
2-4. Optional<Member> findByName(String name) : name으로 회원정보 조회
@Override
public Optional<Member> findByName(String name) {

    String sql = "select * from member where name = ? ";

    Connection conn = null;
    PreparedStatement pstmt = null;
    ResultSet rs = null;

    try {
        conn = getConnection();
        pstmt = conn.prepareStatement(sql);
        pstmt.setString(1, name);

        rs = pstmt.executeQuery();

        if(rs.next()) {
            Member member = new Member();
            member.setId(rs.getLong("id"));
            member.setName(rs.getString("name"));
            return Optional.of(member);
        } else {
            return Optional.empty();
        }

    } catch(Exception e) {
        throw new IllegalStateException(e);
    } finally {
        close(conn, pstmt, rs);
    }
}
2-5. List<Member> findAll() : 회원정보 전체 조회
@Override
public List<Member> findAll() {
    String sql = "select * from member";

    Connection conn = null;
    PreparedStatement pstmt = null;
    ResultSet rs = null;

    try {
        conn = getConnection();
        pstmt = conn.prepareStatement(sql);
        List<Member> members = new ArrayList<>();

        rs = pstmt.executeQuery();

        while(rs.next()) {
            Member member = new Member();
            member.setId(rs.getLong("id"));
            member.setName(rs.getString("name"));
            members.add(member);
        }
        return members;
    } catch(Exception e) {
        throw new IllegalStateException(e);
    } finally {
        close(conn, pstmt, rs);
    }
}
***3. SpringConfig 수정

@Configuration 으로 SpringConfig class 도 Spring Bean으로 관리되는데, 그 중 Datasource 객체를 추가하여 application.properties 의 설정을 Datasource 객체로 DB 접근정보를 javax 을 활용하여 받아올 수 있다.

그리고 memberRepository 에 대한 구현 class 가 JdbcMemberRepository 로 바뀌었고, 호출 시 생성자가 생성될 때 dataSource 를 주입받으므로 파라미터에 datasource를 추가해준다.
4. 동작 확인
동작 확인을 위한 서버 실행 시 에러가 발생하였다..
- 참고
[Spring Boot, IntelliJ] build.gradle, application.properties 빨간줄이 뜰 때
JDBC 실습 중 JDBC 필요 라이브러리를 build.gradle 에 추가하고, apllication.properties 에 datasource 정보를 작성하였는데, gradle 에 빨간줄이 그어졌다. SpringConfig 또한 수정한 상태. 그리고 main me..
rezal.tistory.com
그리고 JDBC 로 데이터를 추가할 때 시퀀스의 상태가 이상했다. id가 1,2 다음 33부터 시작했다.
[h2 database] h2-console 시퀀스 초기화
h2 database 에 JDBC 를 이용해서 회원등록, 회원조회 실습을 진행하는 도중 시퀀스가 33부터 발생하는 괴랄한 현상이 발생하였다... h2-console 에서 시퀀스 탭에 현재 값을 확인할 수 있었다. https://www.i
rezal.tistory.com
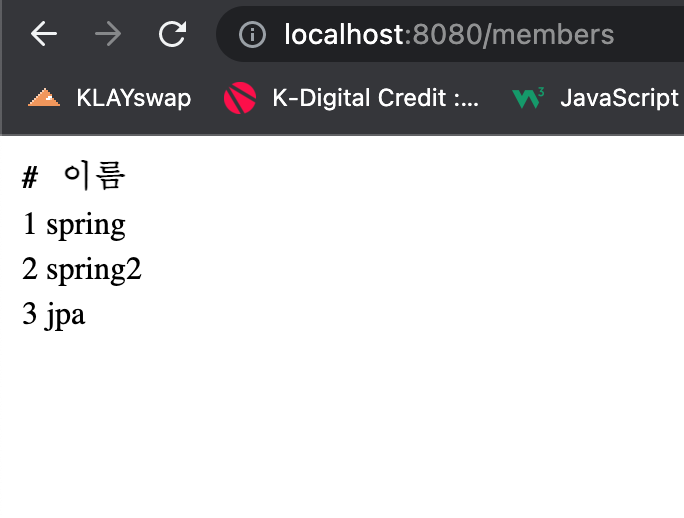

아무튼 해결하고, 메인메서드 동작까지 잘 확인하였다.
- 마무리 : Spring 을 사용하는 이유

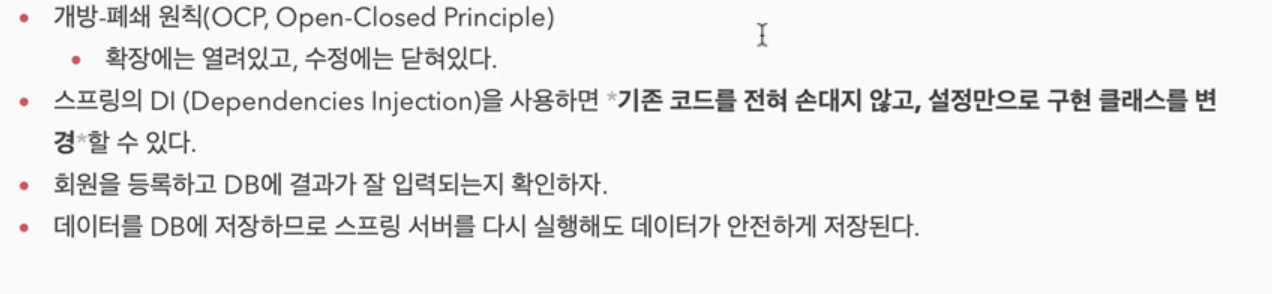
결국 Spring 을 사용하는 이유는 '다형성' 이다.
Spring Container 에서 bean을 활용하여 객체로 관리하고, 의존성을 주입하는 방식으로 다형성을 보장할 수 있다.
즉, 새로 구현체를 생성하여 기존 인터페이스의 관계를 재정립하고 싶다면,
각 인터페이스나 클래스의 모든 코드를 수정할 필요 없이 Spring 의 다형성 특징을 이용하여 SpringConfig 를 수정해서 구현체에 대한 class 나 인터페이스에 대한 관계만 재정립 하면 되는 것이다.
이는 곧 객체지향의 5대원칙, SOLID 원칙 중 OCP(개방-폐쇄 원칙)이 잘 적용된 사례라고 볼 수 있다.
즉, Spring의 DI 를 잘 이용하여 어플리케이션의 코드를 직접 손대지 않고, 설정만으로 구현 클래스를 변경한 것이다.
https://dev-momo.tistory.com/entry/SOLID-%EC%9B%90%EC%B9%99
SOLID 원칙
프로그래밍 설계를 하다보면 객체지향 5대원칙 또는 SOLID 원칙이란 단어를 들어본 적이 있을 것이다. 당시에 구글링을 하여 찾아보았지만 프로그래밍 내공이 부족하여 잘 이해가 되지 않았다.
dev-momo.tistory.com
'Java > 스프링 입문 - 스프링 부트, 웹 MVC, DB 접근 기술' 카테고리의 다른 글
| [Spring Boot] Spring 통합 테스트(@SpringBootTest, @Transactional) (0) | 2022.07.05 |
|---|---|
| [Spring DB 접근 기술 - (1)] JDBC, JPA와 h2 Database 설치 (0) | 2022.07.05 |
| [회원 관리 예제 : 웹 MVC 개발] 홈, 회원 등록, 회원 조회 (0) | 2022.07.01 |
| [Spring Bean과 의존관계 - (2)] Java Code 로 직접 Spring Bean 에 등록하기 (0) | 2022.07.01 |
| [Spring Bean과 의존관계 - (1)] Component Scan 과 자동 의존관계 설정 (0) | 2022.07.01 |


